Showing posts with label Agile. Show all posts

July 19, 2019

Just one button to provision a production-grade Kubernetes cluster

(this is a guest post, authored by my esteemed colleague Fabio Di Niro)

Do you remember?


I bet all of you who are working or playing with Kubernetes remember perfectly the first time you tried to install it.
And the second.
And the third.
...
And the one that finally worked out.

And if you’re a professional you remember also the long path that brought you to own the expertise on Kubernetes that you need to install and fine-tune production grade clusters.
Or, if you’re not a Kubernetes professional, you probably remember how much time it took for you to find someone able to perform a valid Kubernetes install...and how much it costed.

To save all this time and effort to our customers Cisco released the Cisco Container Platform (CCP), a turnkey solution to easily provision production-grade Kubernetes clusters on-prem or in the cloud in minutes, with few mouse clicks and requiring little to no knowledge of K8s.
All the needed integrations with network, storage, computing and security are done automatically by CCP so that the provisioned K8s clusters are ready to run in production.
Clusters provisioned by CCP are already equipped with finely configured monitoring and logging tools like FluentD, Grafana, ElasticSearch, Kibana.
Through the Container Network Interface (CNI) you can choose whether to leverage Cisco ACI as network infrastructure or Calico (no dependence on the underlying infrastructure).

This is already great, but I thought to create a demo that may push the simplicity of those “few mouse clicks” to its limit, making possible to create a production grade cluster in just one click.


Introducing the Kubernetes dash button.

The concept is fairly simple: build a dash button that, once pressed, creates a production grade Kubernetes cluster ready to use.

Leveraging the rich set of the Cisco Container Platform (CCP) APIs this is even too easy, so I thought to add some more feature on top:

- I wanted to provision the cluster and access it just through the dash button. So, I want CCP to display on the dash button itself the IP address of the master node of the cluster created
- The start and finish of the cluster provisioning process had to be confirmed, so the communications had to be bi-directional with the dash button
- I wanted a fair battery life that would avoid me to recharge the button every day, so I needed to have electronics able to sleep or hibernate
- My lab, where I have the infrastructure and the CCP, is behind a proxy, so I can’t listen for calls inside the lab, I can just initiate communications from the lab. So, I needed a way to change the “push” of the button in a “pull” of the button press information
- I wanted to use the button everywhere I go without worrying about the local Wi-Fi settings


How it works

To satisfy all the above requirements I added a couple of elements in the picture, ending up with the following architecture:


The button is based on an Arduino ESP 32 board, it connects via Wi-Fi to my smartphone and uses its internet connection, this way I can use the button everywhere my phone has data signal. The button leverages a publish-subscribe message service (MQTT) in the cloud to bypass the limitation of the proxy I have behind my lab and reach a couple of scripts that calls the right API in the Cisco Container Platform to trigger the provisioning of a shiny new Kubernetes cluster.
Once the cluster is provisioned the IP address of the master node is returned to the dash button that shows it on its display, at this point it is ready to accept connection and be used.

A 3D printed enclosure completed my project, I took an existing model but then I decided to  leverage the capabilities of CCP to deploy K8s clusters on-prem or in the cloud so I designed the two different enclosures you can see in the picture to have two different dash buttons for the two different deployment target.
All the code and 3D designs have been released and are publicly available at: https://github.com/fdiniro/CCPDashButton


Now, before doing my demo, I can ask to my customers: “How much time and effort takes you to install a production-grade, fully operationalized and secured kubernetes cluster?” and whatever answer I get I know I can answer “I can do it in 2 minutes blindfolded and cuffed”.

You can see the recorded demo here: https://youtu.be/-F-xR0XNPBs


July 25, 2018

Have you ever considered CI/CD as a Service?

Introduction    


Would you like to create a complete, fully configured environment for Continuous Integration / Continuous Delivery with a single request, saving you ton of times in configuring and managing the pipeline? If so keep reading this post, the first one of a series of three where Stefano and I will focus on automation in CloudCenter to align with a DevOps methodology. The entire series is coauthored with Stefano Gioia, a colleague of mine at Cisco. We will be talking about a solution we’ve built on top of Cisco CloudCenter to support CI/CD as a Service.   

To keep things simple, we've decided to split the story into three posts.  
•  In the first post (this one), we will introduce the use case of CI/CD as a Service, describing it in detail to show the business and technical benefits.  
•  The second post will guide you through automating the deployment of a complete CI/CD environment in few minutes, by implementing a service in the catalog exposed by Cisco CloudCenter.  
•  In the third post, we will show how to apply CI/CD to the lifecycle of a sample application.   

A little refresh on DevOps    


Before taking this journey let’s first clarify what we mean by using the term “DevOps.” DevOps is not a technology or a magic wand that will instantly help you unify the development (Dev) and management (Ops) of your applications.   
DevOps encompasses more than just software development.   
It's a philosophy of cooperation between different teams in a company, mostly Development (Dev) and Operations (Ops), with the ultimate goal of being more productive and successful in launching new (or updating existing) services to reflect what your customers want.    
As shown in the picture below, this is how we see DevOps: as a human brain. We know that the right hemisphere of a human brain is said to be creative, conceptual, holistic: the opposite of the left region, which is rational and analytic.  


Apparently, two distinct aspects that cannot always work together. But nature finds a way to allow them to cooperate for the benefit of the human body.     
The very same concept can be utilized for your company: your Dev and Ops team has to collaborate to get significant benefits in productivity such as shorter deployment cycles which means increased frequency of software releases and finally better reaction to market and customer needs by quickly deploying new application features.   

What about Continuous Integration / Continuous Delivery / Continuous Deployment?    


Today Continuous Integration, Delivery and Deployment is a common practice in IT software development.    
The central concept is about continuously making small changes to the code, building, testing and delivering more often, more quickly and more efficiently, to able to respond rapidly to changing business contexts.    
The picture below illustrates a sample CI/CD process divided into stages:  
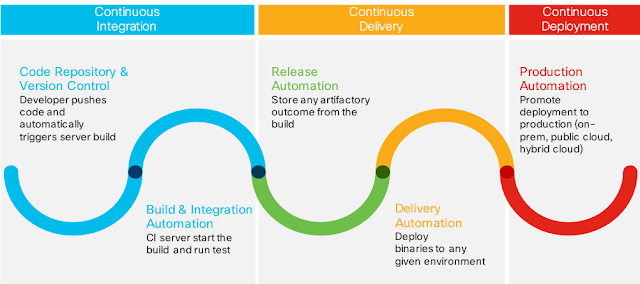

Stages in the CI/CD process


• Continuous Integration 

A common practice of frequently integrating and continuously merging code changes from a team of developers into a shared code repository. Quite often, after new code is committed to a repository, the server triggers a “build” and runs some basic test. Once the application is built and all the tests are passed, it’s time to move to the next step: delivery.
  

•  Continuous Delivery  

Simply means delivering the build to a specific target (environment), like Integration Test, Quality Assurance, or Pre-Production.   

•  Continuous Deployment  

Is fundamentally an extension of Delivery (and sometimes it’s included in the Delivery process). It allows you to repeat deployment of your application to production, even many times per day. The production environment could be an on-premises environment or a public cloud. In some advanced scenario, applications can be deployed in a hybrid model, example database on-premise while business logic and front end in a public cloud. This is called a hybrid deployment.    

Usually, when defining a CI/CD pipeline you will need at least the following components:
•  A code repository to host and manage all your source code 
•  A build server to build an application from source code 
•  An integration server/orchestrator to automate the build and run test code 
•  A repository to store all the binaries and items related to the application 
•  Tools for automatic configuration and deployment    

Let’s take a look at the typical challenges of implementing a CI/CD process.  
First of all, having one single CI/CD toolset in your company is not a good option.      
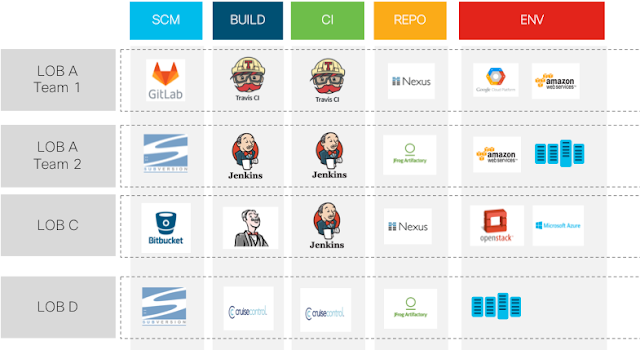

Every LOB uses a different CI/CD toolset

    
As you can see from the picture above, every LOB (line of business) might have different requirements (and sometimes also a developer team inside the same LOB) and most likely they will use different technologies to create a new application/business service. They might even use different code language (Java, nodeJS, .Net, etc.) and be more familiar with a specific tool, e.g. GitHub rather than Subversion.     

How can you accommodate this diversity?    
You probably guessed it right. You can create multiple CI/CD chains and then install multiple tools (perhaps on VM or in a container) depending on the requirements coming from the developers and/or LOB.     
However, how much time you will be spending in configuring every time, for each LOB or DevTeam, a new CI/CD chain? Moreover, what about maintaining and upgrading all the components of the CI/CD toolchain to be compliant with any new security requirements from your security department?     

How long does it take to prepare, configure, deploy and manage multiple CI/CD chains? Sounds like a typical Shadow IT problem, a phenomenon that happens when a Developer Team or LOB users can’t get a fast-enough response from the IT and rush to a public cloud to get what they need. In that case, the solution was to implement automation and self-service to quickly provides the necessary environment to the end users, with the same speed and flexibility as the public cloud.    

Wouldn’t be much easier to adopt the same approach and merely automate the deployment and configuration of the CI/CD chain with a single request generated by a simple HTML form?    
Good news: that’s precisely the purpose of “CI/CD as a Service.”   

Introducing “CI/CD as a Service” 


Let us first clarify an important point: we are not discussing relocating your CI/CD resources and process to the cloud, and then consuming from there. Nor we are discussing the automation task performed by the CI/DP pipeline (push code to the repository, the automatic build of the code, test, and deployment).    

What we are proposing here is to automate the deployment and configuration of the tools that are part of your CI/CD Pipeline. With a single request, you will be able to select, create, deploy and configure the tools that are part of your automated CI/CD pipeline.    

The key things here is that the customer (a LOB as an example) can decide which are the components that will be part of the CI/CD pipeline. One pipeline could be composed by GitLab, Jenkins, Maven, Artifactory while another one could be composed by SNV,Travis,Nexus.    

Your customer will have their own CI/CD chain preconfigured, ready to be used so they can be more productive and focus on what’s matter: create new feature and new applications to sustains your business and competitive advantages.    

Let's now have a look at some of the technical and business benefits you can expect if you embrace CI/CD as a Service.

From a technical point of view, here are some good points:

•  Adaptable: your LOB/Dev Team can cherry-pick the tools they need it, from your catalog 
•  Preconfigured: all the components selected, once deployed, are configured to work immediately for you. 
•  Error-free: as you automated all the steps to deploy and configure the elements, this leaves no room for any human error or misconfiguration 
•  Clean: always have a clean, stable and up to date environment ready to be used 
•  Multi-tenant: serving multiple Line of Business (LOB) in your company: each LOB can have his own environment 
•  Easy Plug: as it’s callable by using REST API, you can easily integrate your IT Service Management system for self-service 
•  Independent Solution: can run on top of any infrastructure/on-prem private cloud    

Don’t stop the business: are you running out of on-premise resources? The solution allows you to quickly deploy the service, temporarily, in a public cloud to avoid blocking the development of your critical project.    

The majority of customers are interested in the CI/CD approach, and they are actively looking for a solution that can be easily implemented and maintained; therefore, we firmly believe that a solution for Cisco will be seen as an enabler for their business strategy.    

In the next post, we will present a solution that decouples the tools utilized in CI/CD pipeline from the deployment targets.  The Use Case is implemented by Cisco CloudCenter (CCC) a fundamental component of the Cisco Multicloud Solution.      

Credits

This post has been authored by Stefano Gioia, a colleague of mine at Cisco.


June 15, 2017

The best open source solution for microservices networking


Introduction

There a big (justified) hype around containers and microservices.
Indeed, many people speak about the subject but few have implemented a real project.
There is also a lot of excellent resources on the web, so there is no need for my additional contribution.
I just want to offer my few readers another proof that a great solution exists for containers networking, and it works well.
You will find evidences in this post and pointers to resources and tutorials.
I will explain it in very basic terms, as I did for Cisco ACI and SDN, because I’m not talking to network specialists (you know I’m not either) but to software developers and designers. 
Most of the content here is reused from my sessions at Codemotion 2017 in Rome and Amsterdam (you can see the recording on youtube). 

Containers Networking

When the world moved from bare metal servers to virtual machines, virtual networks were also created and added great value (plus some need for management).


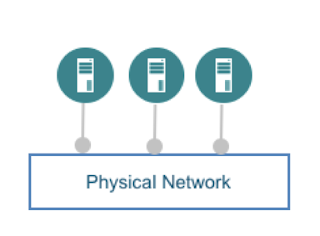
physical hosts connected to a network
Initially networking was simple

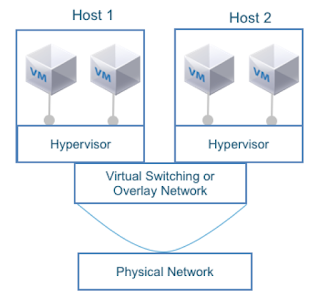
Of course virtual networks make the life of developers and servers managers easier, but they also add complexity for network managers: now there are two distinct networks that need to be managed and integrated.
You cannot simply believe that an overlay network runs on a physical dumb pipe with infinite bandwidth, zero latency and no need for end to end troubleshooting.


Virtual Machines connected to an overlay network

With the advent of containers, their virtual networking layered on top of the VM virtual network (the majority of containers run inside VM for a number of reasons), though there are good examples of container runtime on physical hosts.
So now you have 3 network layers stacked on top of each other, and a need to manage the network end to end that makes your work even more complex.


Containers inside VM: many layers of overlay networks

This increased abstraction creates some issues when you try to leverage the value of resources in the physical environment:
- connectivity: it's difficult to insert network services, like load balancers and firewalls, in the data path of microservices (regardless the virtual or physical nature of the appliances).
- performances: every overlay tier brings its own encapsulation (e.g. vxlan). Encapsulation over encapsulation over encapsulation starts penalizing the performances... just a little  ;-)
- hardware integration: some advanced features of your network (performances optimization, security) cannot be leveraged
Do not despair: we will see that a solution exists for this mess.

Microservices Networking


This short paragraph describes the existing implementation of the networking layer inside the containers runtime.
Generally it is based on a pluggable architecture, so that you can use a plugin that is delegated by the container engine to manage the container's traffic. You can choose among a number of good solutions from the open source community, including the default implementation from Docker.

Minimally the networking layer provides:
- IP Connectivity in Container’s Network Namespace
- IPAM, and Network Device Creation (eth0)
- Route Advertisement or Host NAT for external connectivity


containers networking
The networking for containers

There are two main architectures that allow to plug an external implementation for networking: CNM and CNI. Let's have a look at them.

The Container Network Model (CNM)    


Proposed by Docker to provide networking abstractions/API for container networking. 
It is based on the concept of a Sandbox that contains configuration of a container's network stack (Linux network namespace).
An endpoint is container's interface into a network (a couple of virtual ethernet interfaces).  
A network is collection of arbitrary endpoints that can communicate. 
A container can belong to multiple endpoints (and therefore multiple networks).
  
CNM allows for co-existence of multiple drivers, with a network managed by one driver   
Provides Driver APIs for IPAM and for Endpoint creation/deletion.  
- IPAM Driver APIs: Create/Delete Pool, Allocate/Free IP Address Network   
- Driver APIs: Network Create/Delete, Endpoint Create/Delete/Join/Leave  

Used by docker engine, docker swarm, and docker compose.  
Also works with other schedulers that runs standard containers e.g. Nomad or Mesos.


Container Network Model

Container Network Model


The Container Network Interface (CNI)


Proposed by CoreOS as part of appc specification, used also by Kubernetes. 
Common interface between container run time and network plugin.
Gives driver freedom to manipulate network namespace.
Network described by JSON configuration.

Plugins support two commands: 
- Add Container to Network 
- Remove Container from Network     

Container Network Interface

Container Network Interface

Many good implementations of the models above are available on the web.
You can pick one to complement the default implementation with a more sophisticated solution and benefit from better features.  

It looks so easy on my laptop. Why is it complex?


When a developer sets up the environment on its laptop, everything is simple.
You test your code and the infrastructure just works (you can also enjoy managing... the infrastructure as code).
No issues with performances, security, bandwidth, logs, conflicts on resources (ip address, vlan, names…).
But when you move to an integration test environment, or to a production environment, it’s no longer that easy.
IT administrators and the operations team are well aware of the need for stability, security, multi tenancy and other enterprise grade features.
So not all solutions are equal, especially for networking. Let's discuss their impact on Sally and Mike:


Sally (software developer) - she expects:
Develop and test fast 
Agility and Elasticity 
Does not care about other users


Mike (IT Manager) - he cares for: 
Manage infrastructure 
Stability and Security 
Isolation and Compliance 

These conflicting goals and priorities challenge the collaboration and the possibility to easily adopt a DevOps approach.
A possible solution is a Policy-based Container Networking.
Policy based management is simpler thanks to Declarative Tags (used instead of complex commands syntax), and it is faster because you manage Groups of resources instead of single objects (think of the cattle vs pets example).

What is Contiv


Contiv unifies containers, VMs, and bare metal servers with a single networking fabric, allowing container networks to be addressable from VM and bare-metal network endpoints.  Contiv combines strong network performance, support for industry-leading hardware, and an application-oriented policy that can move across networks together with the application.

Contiv's goal is to manage the "operational intent" of your deployment in a declarative way, as you generally do for the "application intent" of your microservices. This allows for a true infrastructure as code management and easy implementation of DevOps practices.


Contiv provides an IP address per container and eliminates the need for host-based port NAT. It works with different kinds of networks like pure layer 3 networks, overlay networks, and layer 2 networks, and provides the same virtual network view to containers regardless of the underlying technology. 

Contiv works with all major schedulers like Kubernetes, Docker Swarm, Mesos and Nomad. These schedulers provide compute resources to your containers and Contiv provides networking to them. Contiv supports both CNM (Docker networking Architecture) and CNI (CoreOS and Kubernetes networking architecture). 
Contiv has L2, L3 (BGP), Overlay (VXLAN) and ACI modes. It has built in east-west service load balancing. Contiv also provides traffic isolation through control and data traffic. 
It manages global resources: IPAM, VLAN/VXLAN pools.


Contiv Architecture


Contiv is made of a master node and an agent that runs on every host of your server farm:

Contiv and its clustered architecture
Contiv's support for clustered deployments

The master node(s) offer tools to manipulate Contiv objects. It is called Netmaster and implements CRUD (create, read, update, delete) operations using a REST interface. It is expected to be used by infra/ops teams and offers RBAC (role based access control).

The host agent (Netplugin) implements cluster-wide network and policy enforcement. It is stateless: very useful in case of a node failure/restart and upgrade.

A command line utility (that is a client of the master's REST API) is provided: it's named netctl.

Contiv and its cluster wide architecture
Contiv's architecture


Examples


Learning Contiv is very easy: from the Contiv website there is a great tutorial that you can download and run locally.
For your convenience, I executed it on my computer and copied some screenshots here, with my comments to explain it step by step.

First, let's look at normal docker networks (without Contiv) and how you create a new container and connect it to the default network:


Networks in Docker
Networks in Docker


You can inspect the virtual bridge (in the linux server) that is managed by Docker: look at the IPAM section of the configuration and its Subnet, then at the vanilla-c container and its ip address.


How Docker sees its networks


You can also look at the network config from within the container:


the network config from within the container

Now we want to create a new network with Contiv, using its netctl command line interface:

Contiv's netctl command line interface
Contiv's netctl command line interface

Here you can see how Docker lists and uses a Contiv network:


how Docker lists and uses a Contiv network

Look at the IPAM section, the name of the Driver, the name of the network and of the tenant:


We now connect a new container to the contiv-net network as it is seen by Docker: the command is identical when you use a network created by Contiv.


Multi tenancy

You can create a new Tenant using the netctl tenant create command:

Creating tenants in Contiv

A Tenant will have its own networks, that can overlap other tenants' network names and even their subnets: in the example below, the two networks are completely isolated and the default tenant and the blue tenant ignore each other - even though the two networks have the same name and use the same subnet
Everything works as if the other network did not exist (look at the "-t blue" argument in the commands).

Two different networks, with identical name and subnet, can exist in different tenants
Two different networks, with identical name and subnet


Let’s attach a new container to the contiv-net network in the blue tenant (the tenant name is explicitly used in the command, to specify the tenant's network):


All the containers connected to this network will communicate. The network extends all across the cluster and benefits of all the features of the Contiv runtime (see the website for a complete description).


The policy model: working with Groups


Contiv provides a way to apply isolation policies among containers groups (regardless of the tenants, eventually within the tenants).  To do that we create a simple policy called db-policy, then we associate the policy to a group (db-group, that will contain all the containers that need to be treated the same) and add some rules to the policy to define which ports are allowed.

Creating a policy in Contiv


(click on the images to zoom in)

Adding rules to a policy


Finally, we associate the policy with a group (a group is an arbitrary collection of containers, e.g. a tier for a microservice) and then run some containers that belong to db-group:


Creating a group in Contiv, so that many containers get the same policies
Creating a group


The policy named db-policy (defining, in this case, what ports are open and closed) is now applied to all the 3 containers: managing many end points as a single object makes it easy and fast, just think about auto-scaling (especially when integrated with Swarm, Kubernetes, etc.).

The tutorial shows many other interesting features in Contiv, but I don't want to make this post too long  :-)


Features that make Contiv the best solution for microservices networking


  • Support for grouping applications or applications' components.
  • Easy scale-out: instances of containerized applications are grouped together and managed consistently.
  • Policies are specified on a micro-service tier, rather than on individual container workloads.
  • Efficient forwarding between microservice tiers.
  • Contiv allows for a fixed VIP (DNS published) for a micro-service
  • Containers within the micro-services can come and go fast, as resource managers auto-scale them, but policies are already there... waiting for them.
  • Containers' IP addresses are immediately mapped to the service IP for east-west traffic.
  • Contiv eliminates the single point of forwarding (proxy) between micro-service tiers.
  • Application visibility is provided at the services level (across the cluster).
  • Performances are great (see references below).
  • It mirrors the policy model that made Cisco ACI an easy and efficient solution for SDN, regardless the availability of an ACI fabric (Contiv also works with other hw and even with all-virtual networks).

I really invite you to have a look and test it yourself using the tutorial

It's easy and not invasive at all, seeing is believing.


January 22, 2017

Hybrid Cloud and your applications lifecycle: 7 lessons learned


Hybrid Cloud is a must nowadays, I will not spend a word to convince you (you’d not be reading this post if you didn’t believe it). This is the story of a real project.

This post provides more context about the story I summarized at Just 1 step to deploy your applications in the cloud(s).
The structure of the post is:
  • Motivation
  • Use Cases
  • Time
  • Software Stack
  • Benefit of the architecture we implemented
  • Lessons Learned (the most important part)


Motivation for hybrid cloud, and most of the work in my customers' projects, include the following areas:
- Cost control (there is a strong debate: some swear it’s cheaper, others have discovered hidden costs: e.g. network traffic in production, after they made a business case just on the cost of VM provisioning).
- Governance model (IT must find a way to maintain control over resources usage, design patterns, compliance and security when application developers chose private cloud or public cloud).
- Mature technical solution: architecture and technology (there are many good products and system integrators in the market)

But, once you have made a decision, what will you run in the hybrid cloud?
Will your applications be spread across the boundary of your datacenter (one tier inside, other tiers outside)?
Or can we say that it is rather a multi-cloud deployment, where you have a number of resource pools that you can use as a target for deployments?

This project was made by a large corporation, to test how a hybrid cloud can be built and operated and to verify the impact on their current organization.
It is not a full production environment, it’s a pilot project that demonstrated on a small scale how easily you can build a software defined fully automated data center, including both resource pools from your local data center(s) and from public cloud providers.

The solution is expected to be cost effective, of course, but the greater benefits come from business agility and consistent governance.


Use Cases:

The evaluation was focused on 3 main use cases, all requiring that end users order the deployment of a complex software stack from a service catalog: the target for the deployment can be either the private cloud or the public cloud, or a combination of the two. These are the areas where the implementation demonstrated the value of the multi-cloud solution:
  • Business Intelligence (self-deployment of R Studio and additional tools)
  • ETL (self-deployment of a common software for ETL that data scientists would use in autonomy)
  • High Performance Computing (HPC) on OpenStack, with the integration of a DevOps pipeline.

Subject matter experts were provided from different lines of business in the company to support the implementation activities and evaluate the result. 
The use cases represent some frequent activities that the company needs in their usual business, especially in R&D. Improving efficiency and quality in the associated processes will have an impact on the overall business outcome. Applications were selected for the self service catalog that are deployed frequently (every week) and whose installation process takes time (some man days, accounting for both infrastructure and software setup), delaying business objectives.

Time:

All the activities in the project were delivered in time (six weeks), including the setup of the hardware and software systems for the hybrid cloud, the implementation of the 3 main use cases and some additional use cases, the functional tests and the stress tests. This is a demonstration that a proper selection of the technology and a good organization of the project allow for immediate return.
Challenges like setup of the remote access to the lab for remote experts, constraints in the networking and security configuration in the lab, some missing information about the process to install the applications (essential to build the model for the automation) slowed down the implementation. See Lessons learned.

Software Stack:

This is a complete end to end solution: its adoption will happen with a phased approach, starting from the components that grant an easy and immediate impact on the most critical business requirements and adopting some non-functional components later to complete the architecture. The extension from private cloud (based on any combination of VMware, other hypervisors and OpenStack) to a hybrid cloud (integrating AWS, Azure and more) was very quick (it is just a matter of configuration and definition of the governance model). Checkmarks in the picture show what we realized in the short timeframe of the project. The rest is part of a phased plan. The blue boxes show the components provided by Cisco.


a full solution for the hybrid cloud

The fundamental component in this architecture is Cisco CloudCenter (CCC), that has 2 main roles: 
- providing an orchestration solution that offers users the possibility to self-deploy complex software stacks from blueprints offered in a catalog, 
- brokering cloud resources from both private and public clouds (in the project we integrated VMware, OpenStack and AWS, but more clouds are supported).
CloudCenter manages the lifecycle of software applications in the cloud (at a level of abstraction where the underlying physical infrastructure does not matter).
The OpenStack use cases for HPC are supported by a Cisco Validated Design named UCSO: it includes a reference architecture for running the Red Hat OSP8 distribution on a certified hardware platform made of Cisco UCS servers and Nexus 9000 switches. The setup process and the operations are defined by the official deployment guide and Cisco's technical support assumes responsibility on the entire stack, including the Red Hat software.
The management of the entire DC infrastructure from a single orchestration platform was made possible by Cisco UCSD (UCS Director): a single dashboard and workflow engine to manage servers, network and storage, both physical and virtual. The status, the performances and the remaining capacity of all the systems were monitored with Cisco UCSPM (UCS Performance Manager).


Benefits of the architecture we implemented

The implementation of the multi-cloud solution demonstrated the major benefits that a hybrid cloud delivers.
  • A consistent architecture based on software (and eventually hardware) components that integrate easily and satisfy all the business and technical requirements.
  • All components in the architecture are loosely coupled and their integration is based on standard protocols and documented open API. As a consequence, every component can be replaced by an alternative solution (from a different vendor, from the open source, from a custom build) with no fear of vendor lock in.
  • The adoption of a hybrid cloud solution can happen gradually, starting with a core implementation with the most critical components (e.g. CCC, ACI and UCSO), adding more features as a second step (infrastructure automation and monitoring) with UCSD and UCSPM, eventually a unified service catalog and ITSM portal later.

Lessons Learned:

  1. use cases
  2. network topology
  3. security and trust
  4. reusable work (repositories and services)
  5. engage SME and business owners
  6. document
  7. refine (iterations, devops)

Use Cases 
The selection of the use cases is important. You need a quick return to demonstrate the value of the hybrid cloud: the adoption of the hybrid model should address immediate business needs, that the end users can appreciate, rather than be driven just by an industry trend. 
IT projects should not start because a new technology is very smart, but because the outcome makes the business easier and more productive.
Always engage your end users in the planning phase and avoid academic use cases that have a limited appeal on the decision makers. In this project we were lucky because the preparation was done by the steering committee very well in advance.
Once the models for the automation were ready, we could test any combination of the deployment for the application tiers: everything in the private cloud, everything in the public cloud, or the front end deployed on one side and the back end on the other side. The benchmarking capabilities of the product (CCC) allowed to compare the price/performances ratio of the different options based on vSphere, Openstack and AWS - specifically for each application, with tailored reporting.
 
Network Topology
A hybrid environment connects - by definition - areas that were designed separately (your datacenter and the public cloud). They have security policies and configurations that are not meant to work together, and this makes it difficult. Before you start the setup, dedicate the right time to collect all the requirements and to design the connectivity properly. 
We had some issues with the network proxies and the firewalls because of the protocols and ports that we needed to open to allow a proper integration of the Cloud Management Platform (running on premise) with the orchestration engine (with one instance running in each cloud region used in the project, to leverage the local API exposed by the cloud provider and to manage the lifecycle of the applications in the cloud). 

communication among the components of Cisco CloudCenter

Another important requirement is to have a unique repository for all the artifacts, the blueprints and the installation packages for the applications: it should be reachable from all the target clouds that you plan to use, regardless its location (it can be either in the private or in the public cloud, but all the servers you deploy will access it to stand up a new instance of the application). 
The same applies to any public repository that is used in the setup of the applications (both commercial software and open source components, e.g. packages installed using yum).
See also CCC Components Overview for more detail.

Security and Trust
It's important that a good level of trust is established between the architects building the hybrid cloud and the operations team, especially the security guys. Special rules and new policies need to be setup to allow the new platform to work, it's impossible to keep the same old governance model that addresses a single end user identity. 
Sometimes I feel like I'm living - again - the same conflict that I had with Database Administrators, when I tried to configure JDBC database connection pools in the first Java application servers in the 80's. The system should be trusted, and a delegation of the decisions (authentication, authorization and audit) accepted.

Reusable work (repositories and services)
When you model a software application to automate its deployment, you should identify any building block that can potentially be reused in a different model. If you create a reusable (parametric) deliverable and save it individually in a common repository, next time you'll have the work ready to be reused.
This applies to architectural building blocks like database servers, web servers, load balancers, firewalls, distributed caches, etc. 
If they have been created as separate services, instead of just being a part of a monolithic model, they will appear in your designer's palette everytime you model a similar application and you can drag and drop them in the topology. We did that in the project and we saved a lot of time in the implementation. 

Engage SME and business owners
It is important that subject matter experts (SME) collaborate at the definition of blueprints and the build of the automation model. Even though documentation exists for the deployment of the application, you should work together. 
The user knows all the requirements, he knows how to verify and troubleshoot, he has encountered all the setup issues already.
I've learned that the best way to document the setup process for an application, so that you can use it as a reference for the automation, is to ask the SME to install it in front of you in a clean environment where the application was never run, and record a video of the process. It's faster than writing documentation, more complete and reliable. We did that using the desktop sharing feature in Webex and we recorded the sessions.  

Document
While you do the work, keep track of all the steps. Take (maybe informal) notes, but mostly take a lot of screen shots to document what you did. You can keep them on a wiki or on a shared folder, they will help a lot when you have time to create the formal documentation of the project. If you need to troubleshoot, eventually involving other people, this information will be unvaluable.
Of course, versioning and taking snapshots of all deliverables also helps in case you need to go back for whatever reason. 

Refine (iterations, devops)
Create the implementation for a minimum viable product (MVP) as soon as you can. Get the product (i.e. the entire self service catalog, or just the implementation of a single application blueprint) to early customers as soon as possible, to get their feedback before you go too deep in the implementation.
Applied to a hybrid cloud scenario, this will help to evaluate:
- quality of the service you are building, including documentation
- how much the users need it and use it in the real world
- performances of the distributed environment and any bottleneck (network, computing, configuration)
- security implications 
You will have all the time to make it perfect, through iterations that improve the implementation, collect feedback, allow for tuning the design and the configuration. No need to work in a hurry and make mistakes, while you keep your users waiting for the final "perfect" product but they don't see any progress.