August 1, 2018

Lifecycle of an application in CloudCenter with CI/CD

In a previous post we demonstrated how to automate the setup of a Continuous Integration / Continuous Deployment environment.

Now we will demonstrate how to use it: a developer can create an application that will be compiled, then built and deployed into a test environment automatically using this CI/CD toolset. 
Next picture shows the list of operations automated by the CI/CD.

Application deployment: sequence of automated operations
 Application deployment: sequence of automated operations


These are the lifecycle steps that we will demonstrate in this post:
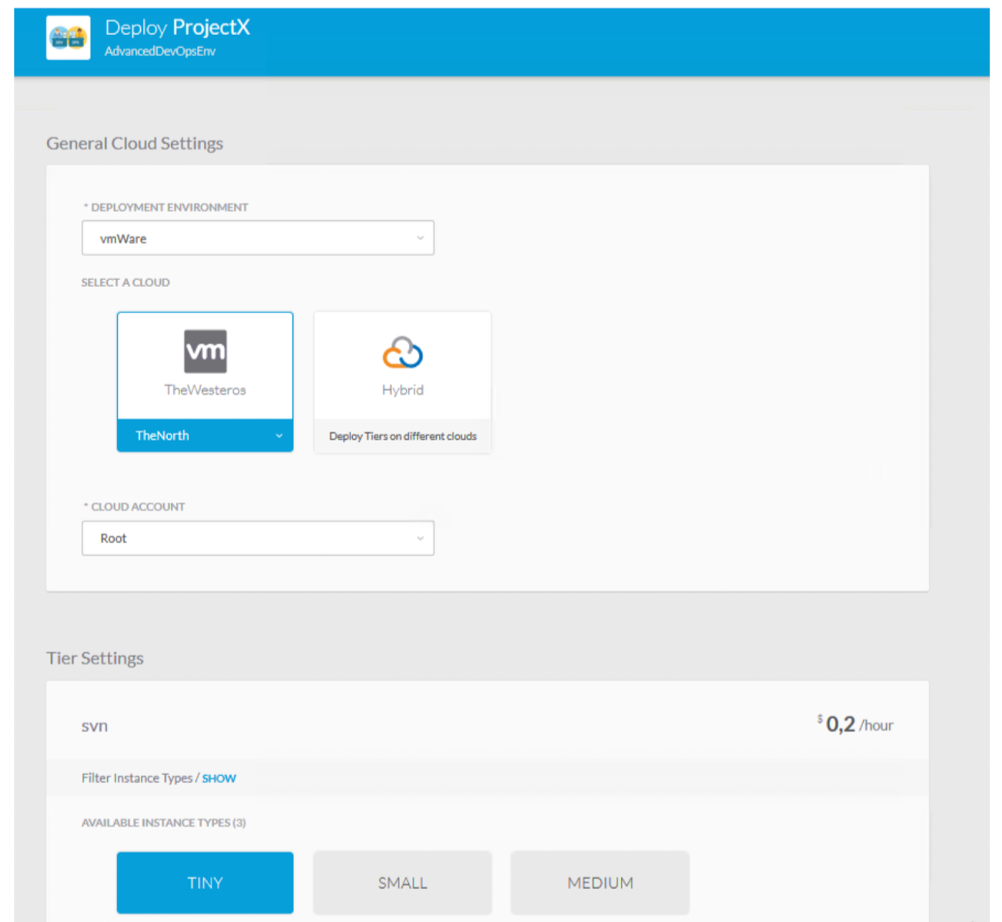
1.    Deploy the PetClinic application (introduced in the previous post) automatically.
2.    Push the java source code to a repository (SVN).
3.    Creating the next release of the application by modifying the java source code and saving it as a new version in the repository.
4.    Watch the Jenkins orchestrator create the new build, save it in the binaries repository (Artifactory) and use CloudCenter to deploy it.

1 - Deploy the PetClinic application automatically. 

We start by deploying the Java application PetClinic, using the Application Profile created in CloudCenter, into our development environment in the lab. The correct behavior of the application is tested by accessing its home page and verifying that it shows correctly in the browser.

 2 - Push the java source code to a repository (SVN). 

We then push the java source code of the PetClinic application into the repository (SVN) that was created in our previous task, committing it as the initial release of the application.


Source code control: committing the java code into the SVN repository
Source code control: committing the java code into the SVN repository 


An automated build of the application and its deployment follow, as explained by the workflow above, thanks to the Jenkins orchestrator and CloudCenter.  If we access the Jenkins GUI (see next picture) through a web browser and we select the project “repo1” we can see that Jenkins is currently creating a new build: look at the progress bar. As soon as the building process is terminated the binaries are copied into the Artifactory repository of binary files and the Jenkins process called “deploy” starts.

Jenkins: following the build process
Jenkins: following the build process  


If we access the “deploy” job in Jenkins, we can see that a new build of the PetClinics application has been sent to CloudCenter to be deployed. This is made possible by the plugin that integrates Jenkins with Cloud Center.

Jenkins: deployment of the PetClinics application through CloudCenter


Cloud Center: viewing the deployment details of the deployed PetClinic application
Cloud Center: viewing the deployment details of the deployed PetClinic application 


PetClinic: home page of the deployed application


 3 - Creating next release of the application by modifying the java source code and saving it as a new version in the repository. 

Let’s assume now that another developer is working at improving the front end of the application and he is ready to commit a major chunk of code. For the sake of the demonstration we will only change the picture and the text on the homepage but we will show that, as soon as we commit the modifications to SVN, the new application is automatically deployed in the Development environment via Cloud Center (as you already know, the Development environment could be in any on-premises/hosted private or public cloud).

Application lifecycle: creating a new version of the code of PetClinic


We will modify the file petclinic/src/main/webapp/WEB-INF/jsp/welcome.jsp changing the text and the pet image (see next picture). Once we are done we save the new version of the file and commit it (right click, SVN Commit).  After waiting a few minutes for the whole chain of operation to finish, we will find out a new deployment of the application in Cloud Center –> Projects –> Project PetClinic  Now we can navigate the application, in the test environment, to see how the new release looks like: you can see that the puppy picture and the text message have been updated according to the edit done by the developer.

PetClinic: home page of the modified application

Conclusion  


The two use cases shown in this series of posts:
•    creation of a CI/CD environment as a service, and
•    automated Deployment of every new release of an application
demonstrate the power of CloudCenter as an orchestrator in deploying applications across a multicloud environment.

Every stage of the project (dev, test, prod…) can be associated to a different deployment environment, potentially in different clouds, having its own set of configuration, policies and rules. This information is stored in CloudCenter as part of the governance model you build for your IT.

The application will move automatically from one phase of the project to next one, if it passes the specific tests (i.e. integration, functional and performances tests, run by the automation tool) after each deployment.

In future posts we’ll show how to also automate these tests in a CI/CD pipeline. 
We will use open source tools like Apache Jmeter to run functional tests designed together with the application and automated by scripts stored in the same source code repository.
And we will run performance tests with the same tool, of course after CloudCenter has moved the deployment to a target environment that is able to sustain the load we generate.  

Credits 


This post is co-authored with a colleague of mine, Stefano Gioia.

References:

CloudCenter 

July 31, 2018

Creating a complete CI/CD environment in few minutes


In a previous post we introduced CI/CD as a Service (CD/CDaaS) and talked about how it can transform and increase the efficiency of your DevOps practice, to serve development teams and Line Of Business (LoB) better.

In this post we will show how to effectively create a CI/CDaaS with Cisco CloudCenter, either for an organization’s internal use or to offer it to your customers, in case you’re an IT service provider.

With our CI/CDaaS we are able to:

1 - Automate the creation of a complete environment for a development project, including:
  • a source code repository (we chose SVN, but it could be GitLab or any other), 
  • an integration server / orchestrator (Jenkins),
  • an artifact repository for the builds (e.g. JFrog Artifactory or Nexus, but it could be any solution including a simple web server or an FTP server)
  • a number of workstations (one per developer) ready to be used with all the needed tools: Eclipse, database tools, etc.
  • a remote desktop access to the workstations, even if the developers don't have access to the network where the project environment is created
2 - Integrate all the above tools end-to-end, creating a complete chain for CI/CD with no human intervention required.
3 - Get every build - generated automatically after any commit in the source code repository - deployed automatically in one of your targets, selected according to the project phase, e.g. development in an on-premises VMware environment, integration test in on-premises OpenStack, and production in AWS public cloud.
4 - Get acceptance tests - required to promote a deployment to the next phase/environment - executed automatically after each deployment in one of the environments.

Everything we describe is implemented using Cisco CloudCenter as the main orchestration engine, in a multicloud context, meaning you can select any private or public cloud as a target for the deployment).

The next picture represents a project leader ordering the deployment of the CI/CD toolset for two distinct projects, possibly in different clouds. 

Creating a complete chain for CI/CD with no human intervention, for two different tenants, with CloudCenter


Step 1: Self-service in the CloudCenter catalog


Accessing the self-service catalog in CloudCenter, the user can order the deployment of a single application or a complex set of components, like our CI/CDaaS service (we call these Application Profiles):


Application Profiles in the self-service catalog


As you can see from the image above, we have created 2 Application Profiles for this demo. The use case is having a development team that releases daily builds of a web application (PetClinic), so we have built:

  1. A cloud-agnostic Application Profile to deploy PetClinic, that takes the binary files required for the deployment from a common repository (that will be the Artifactory server created by our CI/CD service described below). The name of this Application Profile (that is a service in the CloudCenter catalog) is “Clinic”. You can select one specific version of the application binaries that you want to deploy from the Artifactory repository (by default you use the last build available).

    Please note that we will not focus on the way a generic Application Profile is built and deployed, because it’s covered in the CloudCenter documentation, but PetClinic is functional in our example as developers will generate new builds that need to be deployed.

  1. A cloud-agnostic Application Profile to deploy the CI/CD toolset including SVN, Jenkins and Artifactory, installed in their own VM. The name of this service in the CloudCenter catalog is “AdvancedDevOpsEnv”; it creates an operating project environment where the “Clinic” application can be deployed automatically at every new commit made by a developer.

    This is the implementation of our CI/CDaaS concept.


Step 2: Deploying the CI/CD toolset


When you “order” the AdvancedDevOpsEnv service you have to set the name of the new project and some options for the deployment (which cloud target, the amount of resources to be allocated when VM or containers are created, etc.); the next picture shows the order wizard in CloudCenter, where you make these selections.


CloudCenter order wizard: you can choose where to deploy the CI/CD toolset and the size of each VM


You can monitor the progress of the deployment while the job runs (it takes approximately 15 minutes to complete) as you can see in the image below:


Watching the progress in CloudCenter: last deployment state is "Deployed"


Once the deployment is complete, you can see the details of the new VM that has been created by clicking on the server representation on the left (e.g. Jenkins – see next picture) and expanding the list of running nodes on the right.

Please Note:
  • The IP address of the VM is exposed by CloudCenter.
  • You can access the VM via SSH or RDP directly from the browser (that is very important because connectivity and security are proxied by CloudCenter, so you don't really need any access to the actual network where the VM is deployed).


Accessing the details of the VM and the log of actions executed by the agent


Step 3: verifying the configuration made by CloudCenter

The Jenkins orchestrator is automatically setup with a connection to the SVN source code repository (see the Jenkins job “repo1”, that is the name provided by the user for the repository when he ordered the deployment) and with Cloud Center (see the Jenkins job “deploy”).


The Jenkins orchestrator and the 2 tasks created by CloudCenter


The only manual configuration we need is to set the login and password used by CloudCenter to access the SVN repository (we were not able to automate this configuration): you just need to click on the Jenkins task repo1 (next picture), then click Configure and enter your credentials (in our example, user001/C1sco123). At this point, Jenkins is fully configured and ready to go.


Jenkins: setting credentials to access the SVN repository


The jFrog Artifactory is also ready to receive binaries from Jenkins, at each new build of the application, because CloudCenter sets the required information when configuring Jenkins and Artifactory. Note that the Artifactory repository name (repo1) is the name used for the SVN repository, provided by the user when he ordered the deployment.


The Artifactory repository for binaries (it will host all the builds generated by Jenkins)


Finally, we configure a new Repository in CloudCenter (there might be many), that needs to point at our new Artifactory repository to deploy new builds of your application automatically as they are released.


Cloud Center: setting up a repository for the artifacts that will be deployed


Here we set the IP address of the Artifactory server:


Setting up the repository on Cloud Center


We have now completed the setup of a CI/CD environment for a new project, just consuming a reusable service that creates it in 15 minutes (CI/CDaaS).

In the next post will show how to use it, following the lifecycle of the PetClinic application from editing the source code to automated deployment.

Credits 


This post is co-authored with a colleague of mine, Stefano Gioia.


July 25, 2018

Have you ever considered CI/CD as a Service?

Introduction    


Would you like to create a complete, fully configured environment for Continuous Integration / Continuous Delivery with a single request, saving you ton of times in configuring and managing the pipeline? If so keep reading this post, the first one of a series of three where Stefano and I will focus on automation in CloudCenter to align with a DevOps methodology. The entire series is coauthored with Stefano Gioia, a colleague of mine at Cisco. We will be talking about a solution we’ve built on top of Cisco CloudCenter to support CI/CD as a Service.   

To keep things simple, we've decided to split the story into three posts.  
•  In the first post (this one), we will introduce the use case of CI/CD as a Service, describing it in detail to show the business and technical benefits.  
•  The second post will guide you through automating the deployment of a complete CI/CD environment in few minutes, by implementing a service in the catalog exposed by Cisco CloudCenter.  
•  In the third post, we will show how to apply CI/CD to the lifecycle of a sample application.   

A little refresh on DevOps    


Before taking this journey let’s first clarify what we mean by using the term “DevOps.” DevOps is not a technology or a magic wand that will instantly help you unify the development (Dev) and management (Ops) of your applications.   
DevOps encompasses more than just software development.   
It's a philosophy of cooperation between different teams in a company, mostly Development (Dev) and Operations (Ops), with the ultimate goal of being more productive and successful in launching new (or updating existing) services to reflect what your customers want.    
As shown in the picture below, this is how we see DevOps: as a human brain. We know that the right hemisphere of a human brain is said to be creative, conceptual, holistic: the opposite of the left region, which is rational and analytic.  


Apparently, two distinct aspects that cannot always work together. But nature finds a way to allow them to cooperate for the benefit of the human body.     
The very same concept can be utilized for your company: your Dev and Ops team has to collaborate to get significant benefits in productivity such as shorter deployment cycles which means increased frequency of software releases and finally better reaction to market and customer needs by quickly deploying new application features.   

What about Continuous Integration / Continuous Delivery / Continuous Deployment?    


Today Continuous Integration, Delivery and Deployment is a common practice in IT software development.    
The central concept is about continuously making small changes to the code, building, testing and delivering more often, more quickly and more efficiently, to able to respond rapidly to changing business contexts.    
The picture below illustrates a sample CI/CD process divided into stages:  


Stages in the CI/CD process


• Continuous Integration 

A common practice of frequently integrating and continuously merging code changes from a team of developers into a shared code repository. Quite often, after new code is committed to a repository, the server triggers a “build” and runs some basic test. Once the application is built and all the tests are passed, it’s time to move to the next step: delivery.
  

•  Continuous Delivery  

Simply means delivering the build to a specific target (environment), like Integration Test, Quality Assurance, or Pre-Production.   

•  Continuous Deployment  

Is fundamentally an extension of Delivery (and sometimes it’s included in the Delivery process). It allows you to repeat deployment of your application to production, even many times per day. The production environment could be an on-premises environment or a public cloud. In some advanced scenario, applications can be deployed in a hybrid model, example database on-premise while business logic and front end in a public cloud. This is called a hybrid deployment.    

Usually, when defining a CI/CD pipeline you will need at least the following components:
•  A code repository to host and manage all your source code 
•  A build server to build an application from source code 
•  An integration server/orchestrator to automate the build and run test code 
•  A repository to store all the binaries and items related to the application 
•  Tools for automatic configuration and deployment    

Let’s take a look at the typical challenges of implementing a CI/CD process.  
First of all, having one single CI/CD toolset in your company is not a good option.      


Every LOB uses a different CI/CD toolset

    
As you can see from the picture above, every LOB (line of business) might have different requirements (and sometimes also a developer team inside the same LOB) and most likely they will use different technologies to create a new application/business service. They might even use different code language (Java, nodeJS, .Net, etc.) and be more familiar with a specific tool, e.g. GitHub rather than Subversion.     

How can you accommodate this diversity?    
You probably guessed it right. You can create multiple CI/CD chains and then install multiple tools (perhaps on VM or in a container) depending on the requirements coming from the developers and/or LOB.     
However, how much time you will be spending in configuring every time, for each LOB or DevTeam, a new CI/CD chain? Moreover, what about maintaining and upgrading all the components of the CI/CD toolchain to be compliant with any new security requirements from your security department?     

How long does it take to prepare, configure, deploy and manage multiple CI/CD chains? Sounds like a typical Shadow IT problem, a phenomenon that happens when a Developer Team or LOB users can’t get a fast-enough response from the IT and rush to a public cloud to get what they need. In that case, the solution was to implement automation and self-service to quickly provides the necessary environment to the end users, with the same speed and flexibility as the public cloud.    

Wouldn’t be much easier to adopt the same approach and merely automate the deployment and configuration of the CI/CD chain with a single request generated by a simple HTML form?    
Good news: that’s precisely the purpose of “CI/CD as a Service.”   

Introducing “CI/CD as a Service” 


Let us first clarify an important point: we are not discussing relocating your CI/CD resources and process to the cloud, and then consuming from there. Nor we are discussing the automation task performed by the CI/DP pipeline (push code to the repository, the automatic build of the code, test, and deployment).    

What we are proposing here is to automate the deployment and configuration of the tools that are part of your CI/CD Pipeline. With a single request, you will be able to select, create, deploy and configure the tools that are part of your automated CI/CD pipeline.    

The key things here is that the customer (a LOB as an example) can decide which are the components that will be part of the CI/CD pipeline. One pipeline could be composed by GitLab, Jenkins, Maven, Artifactory while another one could be composed by SNV,Travis,Nexus.    

Your customer will have their own CI/CD chain preconfigured, ready to be used so they can be more productive and focus on what’s matter: create new feature and new applications to sustains your business and competitive advantages.    

Let's now have a look at some of the technical and business benefits you can expect if you embrace CI/CD as a Service.

From a technical point of view, here are some good points:

•  Adaptable: your LOB/Dev Team can cherry-pick the tools they need it, from your catalog 
•  Preconfigured: all the components selected, once deployed, are configured to work immediately for you. 
•  Error-free: as you automated all the steps to deploy and configure the elements, this leaves no room for any human error or misconfiguration 
•  Clean: always have a clean, stable and up to date environment ready to be used 
•  Multi-tenant: serving multiple Line of Business (LOB) in your company: each LOB can have his own environment 
•  Easy Plug: as it’s callable by using REST API, you can easily integrate your IT Service Management system for self-service 
•  Independent Solution: can run on top of any infrastructure/on-prem private cloud    

Don’t stop the business: are you running out of on-premise resources? The solution allows you to quickly deploy the service, temporarily, in a public cloud to avoid blocking the development of your critical project.    

The majority of customers are interested in the CI/CD approach, and they are actively looking for a solution that can be easily implemented and maintained; therefore, we firmly believe that a solution for Cisco will be seen as an enabler for their business strategy.    

In the next post, we will present a solution that decouples the tools utilized in CI/CD pipeline from the deployment targets.  The Use Case is implemented by Cisco CloudCenter (CCC) a fundamental component of the Cisco Multicloud Solution.      

Credits

This post has been authored by Stefano Gioia, a colleague of mine at Cisco.