Showing posts with label infrastructure as code. Show all posts

July 31, 2018

Creating a complete CI/CD environment in few minutes


In a previous post we introduced CI/CD as a Service (CD/CDaaS) and talked about how it can transform and increase the efficiency of your DevOps practice, to serve development teams and Line Of Business (LoB) better.

In this post we will show how to effectively create a CI/CDaaS with Cisco CloudCenter, either for an organization’s internal use or to offer it to your customers, in case you’re an IT service provider.

With our CI/CDaaS we are able to:

1 - Automate the creation of a complete environment for a development project, including:
  • a source code repository (we chose SVN, but it could be GitLab or any other), 
  • an integration server / orchestrator (Jenkins),
  • an artifact repository for the builds (e.g. JFrog Artifactory or Nexus, but it could be any solution including a simple web server or an FTP server)
  • a number of workstations (one per developer) ready to be used with all the needed tools: Eclipse, database tools, etc.
  • a remote desktop access to the workstations, even if the developers don't have access to the network where the project environment is created
2 - Integrate all the above tools end-to-end, creating a complete chain for CI/CD with no human intervention required.
3 - Get every build - generated automatically after any commit in the source code repository - deployed automatically in one of your targets, selected according to the project phase, e.g. development in an on-premises VMware environment, integration test in on-premises OpenStack, and production in AWS public cloud.
4 - Get acceptance tests - required to promote a deployment to the next phase/environment - executed automatically after each deployment in one of the environments.

Everything we describe is implemented using Cisco CloudCenter as the main orchestration engine, in a multicloud context, meaning you can select any private or public cloud as a target for the deployment).

The next picture represents a project leader ordering the deployment of the CI/CD toolset for two distinct projects, possibly in different clouds. 

Creating a complete chain for CI/CD with no human intervention, for two different tenants, with CloudCenter


Step 1: Self-service in the CloudCenter catalog


Accessing the self-service catalog in CloudCenter, the user can order the deployment of a single application or a complex set of components, like our CI/CDaaS service (we call these Application Profiles):


Application Profiles in the self-service catalog


As you can see from the image above, we have created 2 Application Profiles for this demo. The use case is having a development team that releases daily builds of a web application (PetClinic), so we have built:

  1. A cloud-agnostic Application Profile to deploy PetClinic, that takes the binary files required for the deployment from a common repository (that will be the Artifactory server created by our CI/CD service described below). The name of this Application Profile (that is a service in the CloudCenter catalog) is “Clinic”. You can select one specific version of the application binaries that you want to deploy from the Artifactory repository (by default you use the last build available).

    Please note that we will not focus on the way a generic Application Profile is built and deployed, because it’s covered in the CloudCenter documentation, but PetClinic is functional in our example as developers will generate new builds that need to be deployed.

  1. A cloud-agnostic Application Profile to deploy the CI/CD toolset including SVN, Jenkins and Artifactory, installed in their own VM. The name of this service in the CloudCenter catalog is “AdvancedDevOpsEnv”; it creates an operating project environment where the “Clinic” application can be deployed automatically at every new commit made by a developer.

    This is the implementation of our CI/CDaaS concept.


Step 2: Deploying the CI/CD toolset


When you “order” the AdvancedDevOpsEnv service you have to set the name of the new project and some options for the deployment (which cloud target, the amount of resources to be allocated when VM or containers are created, etc.); the next picture shows the order wizard in CloudCenter, where you make these selections.


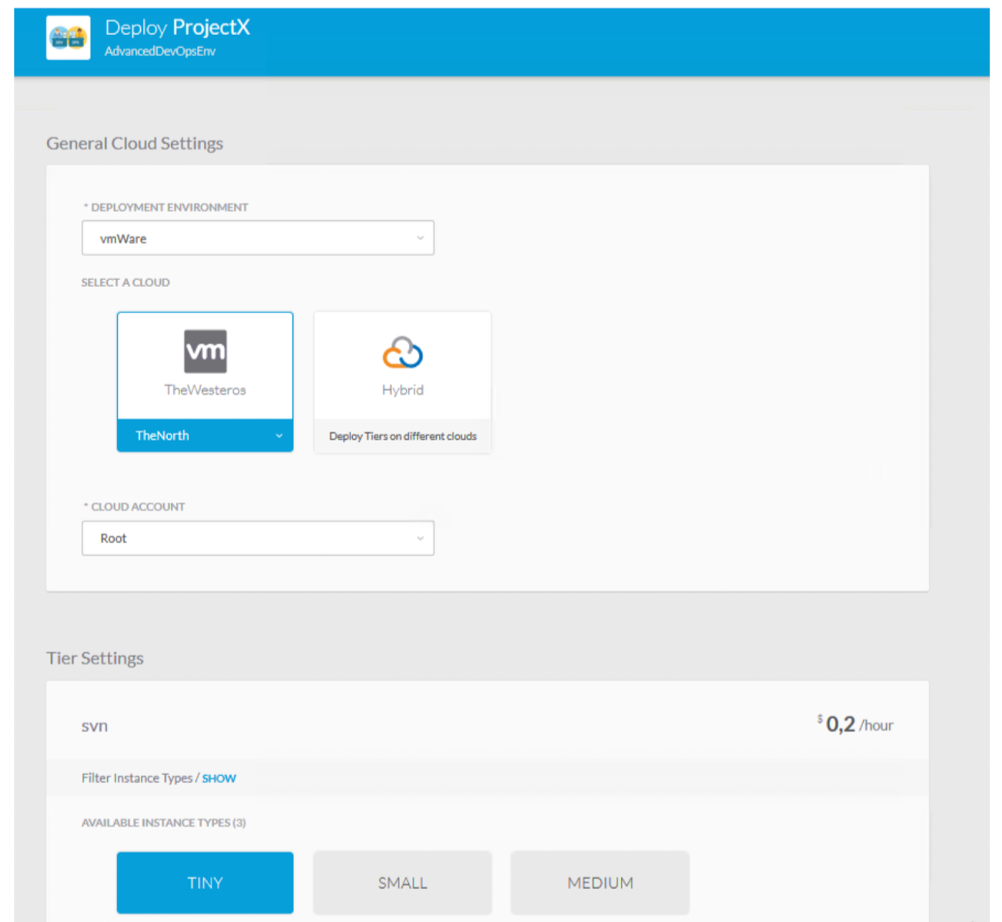
CloudCenter order wizard: you can choose where to deploy the CI/CD toolset and the size of each VM


You can monitor the progress of the deployment while the job runs (it takes approximately 15 minutes to complete) as you can see in the image below:


Watching the progress in CloudCenter: last deployment state is "Deployed"


Once the deployment is complete, you can see the details of the new VM that has been created by clicking on the server representation on the left (e.g. Jenkins – see next picture) and expanding the list of running nodes on the right.

Please Note:
  • The IP address of the VM is exposed by CloudCenter.
  • You can access the VM via SSH or RDP directly from the browser (that is very important because connectivity and security are proxied by CloudCenter, so you don't really need any access to the actual network where the VM is deployed).


Accessing the details of the VM and the log of actions executed by the agent


Step 3: verifying the configuration made by CloudCenter

The Jenkins orchestrator is automatically setup with a connection to the SVN source code repository (see the Jenkins job “repo1”, that is the name provided by the user for the repository when he ordered the deployment) and with Cloud Center (see the Jenkins job “deploy”).


The Jenkins orchestrator and the 2 tasks created by CloudCenter


The only manual configuration we need is to set the login and password used by CloudCenter to access the SVN repository (we were not able to automate this configuration): you just need to click on the Jenkins task repo1 (next picture), then click Configure and enter your credentials (in our example, user001/C1sco123). At this point, Jenkins is fully configured and ready to go.


Jenkins: setting credentials to access the SVN repository


The jFrog Artifactory is also ready to receive binaries from Jenkins, at each new build of the application, because CloudCenter sets the required information when configuring Jenkins and Artifactory. Note that the Artifactory repository name (repo1) is the name used for the SVN repository, provided by the user when he ordered the deployment.


The Artifactory repository for binaries (it will host all the builds generated by Jenkins)


Finally, we configure a new Repository in CloudCenter (there might be many), that needs to point at our new Artifactory repository to deploy new builds of your application automatically as they are released.


Cloud Center: setting up a repository for the artifacts that will be deployed


Here we set the IP address of the Artifactory server:


Setting up the repository on Cloud Center


We have now completed the setup of a CI/CD environment for a new project, just consuming a reusable service that creates it in 15 minutes (CI/CDaaS).

In the next post will show how to use it, following the lifecycle of the PetClinic application from editing the source code to automated deployment.

Credits 


This post is co-authored with a colleague of mine, Stefano Gioia.


September 19, 2016

Infrastructure as Code with Terraform and Cisco Metapod


Recently I worked with a customer to explore the concept of Infrastructure as Code.
They like open source solutions for the automation of the infrastructure and for managing the software applications life cycle.
To reach the first objective their goal is a private cloud based on Openstack, while they will use Ansible and Terraform to manage the environments for different projects.

Managing the Infrastructure as Code means that the definition of the infrastructure is maintained in text files, that could be stored in a version control system like you do with the source code of the application.
If you do that, the same lifecycle applies to both the infrastructure and the application: creation of staging or production environments, automated testing, etc.
Using blueprints helps to improve the quality of the final result of the project and grants compliance with policies and eventual legal obligations.
Benefits include speed, cost savings (avoiding a static allocation of pre-provisioned resources) and risk reduction (removing errors and security violations).
Terraform is one of the best open source tools to manage your Infrastructure as Code: it’s easy to install, learn and use (one hour).
You could start from tutorials and free examples available on Internet.

Here is an example of full automation (we'll try to get a little better result):


As a first step, to make the usage of Openstack easier on a large scale, we discussed the value of a managed service.
If the IT organization could just focus their effort on the development and operations of the business applications, instead of running the infrastructure, they would create more value for the internal customers (company's lines of business).
So I proposed the adoption of Cisco Metapod, that is Openstack as a managed service (delegation of all the tough administrative and operational work to a specialized 3rd party, while you just use the Openstack user interface and API enjoying a SLA of 99.99% uptime). 
I have described the advantage of adopting Openstack as a managed service in this post: Why don't you try Openstack (without getting your hands dirty)? 
Services offered by Cisco Metapod around Openstack
Services offered by Cisco Metapod

We created a lab where Openstack abstracts the resources from the physical and virtual infrastructure (etherogeneous servers, network and storage) and the configuration of different environments is managed by Terraform, so that you can create, destroy, restore and update a complex system in few minutes.


Free to use Openstack for your apps, instead of managing it: focus on your real business

With Terraform you can describe the architecture in a declarative form (in a manifest file).
You simply describe what you need (the desired state), not how the different components (devices and software) must be configured with all their parameters and their specific syntax.
The goal of Terraform is to match the current state of the system with the desired state.


Desired State vs Current State


Terraform is used to create, manage, and manipulate infrastructure resources. Examples of resources include physical machines, VMs, network switches, containers, etc. Almost any infrastructure noun can be represented as a resource in Terraform. Terraform is agnostic to the underlying platforms by supporting providers. A provider is responsible for understanding API interactions and exposing resources. Providers generally are an IaaS (e.g. AWS, GCP, Microsoft Azure, OpenStack), PaaS (e.g. Heroku), or SaaS services (e.g. Atlas, DNSimple, CloudFlare). 

Infrastructure as Code


Desired State

In my lab I reused a good example that I found on GitHub at https://github.com/berendt/terraform-configurations 
It contains all the resources you need to deploy a new Devstack instance (a all-in-one instance of Openstack, useful for developers) including the needed networks, public addresses, firewall rules on a target cloud platform. That, incidentally, is a Openstack instance (so we are deploying Openstack on Openstack).

Here is the content of the main.tf file used by Terraform: it references variables with the format ${variable_name}, including the output from actions on other resources. Dependencies between resources are managed automatically by Terraform. A separate file can contain the predefined values for your variables (like the references to the Openstack lab in my example).

If you are not interested in the content of this file (I guess it applies to 70% of my readers) you can skip it and go to next picture... there is also a good recorded demo down there   :-)


main.tf (the manifest file where Terraform ready the desired state of all the resources):

provider "openstack" {
  user_name  = "${var.user_name}"
  tenant_name = "${var.tenant_name}"
  password  = "${var.password}"
  auth_url  = "${var.auth_url}"
}

resource "openstack_networking_network_v2" "terraform" {
  name = "terraform"
  region = "${var.region}"
  admin_state_up = "true"
}

resource "openstack_compute_keypair_v2" "terraform" {
  name = "SSH keypair for Terraform instances"
  region = "${var.region}"
  public_key = "${file("${var.ssh_key_file}.pub")}"
}

resource "openstack_networking_subnet_v2" "terraform" {
  name = "terraform"
  region = "${var.region}"
  network_id = "${openstack_networking_network_v2.terraform.id}"
  cidr = "192.168.50.0/24"
  ip_version = 4
  enable_dhcp = "true"
  dns_nameservers = ["208.67.222.222","208.67.220.220"]
}

resource "openstack_networking_router_v2" "terraform" {
  name = "terraform"
  region = "${var.region}"
  admin_state_up = "true"
  external_gateway = "${var.external_gateway}"
}

resource "openstack_networking_router_interface_v2" "terraform" {
  region = "${var.region}"
  router_id = "${openstack_networking_router_v2.terraform.id}"
  subnet_id = "${openstack_networking_subnet_v2.terraform.id}"
}

resource "openstack_compute_secgroup_v2" "terraform" {
  name = "terraform"
  region = "${var.region}"
  description = "Security group for the Terraform instances"
  rule {
    from_port = 1
    to_port = 65535
    ip_protocol = "tcp"
    cidr = "0.0.0.0/0"
  }
  rule {
    from_port = 1
    to_port = 65535
    ip_protocol = "udp"
    cidr = "0.0.0.0/0"
  }
  rule {
    ip_protocol = "icmp"
    from_port = "-1"
    to_port = "-1"
    cidr = "0.0.0.0/0"
  }
}

resource "openstack_compute_instance_v2" "terraform" {
  name = "terraform"
  region = "${var.region}"
  image_name = "${var.image}"
  flavor_name = "${var.flavor}"
  key_pair = "${openstack_compute_keypair_v2.terraform.name}"
  security_groups = [ "${openstack_compute_secgroup_v2.terraform.name}" ]
  floating_ip = "184.94.252.189"

  network {
    uuid = "${openstack_networking_network_v2.terraform.id}"
  }

  provisioner "remote-exec" {
    script = "deploy.sh"
    connection {
      user = "${var.ssh_user_name}"
      key_file = "${var.ssh_key_file}"
    }
  }
}


To make it simple, for this blog post I replaced the part that deploys Devstack with a simpler setup of a web server (Apache).

deploy.sh (Terraform will copy and execute it on the remote instance as soon as it is created):

#!/bin/bash

# author: Joe Topjian (@jtopjian)
# source: https://gist.github.com/jtopjian/4ffc82bfcbbcc78d07e4

sudo apt-get update
sudo apt-get install -y -f apache2


The goal is to demonstrate how easy it is to create a new software environment on a Cisco Metapod Openstack target from scratch and run it. 
The following pictures show the Metapod console before and after running the "terraform apply” command on my computer.

This is before I run the command:

The Openstack console from Cisco Metapod: view of the tenant networks
The Openstack console from Cisco Metapod

And this is the expected result (network and server infrastructure created, apache installed):

Terraform has created all the required resources in Openstack
Resources created in Openstack

Next video (the most important part of this post) is a recorded demonstration of the creation of the new Apache server: you can see the launch of the “terraform apply” command that, after reading the manifest file, creates a network, a subnet, a router with two interfaces, a floating ip and a instance on Openstack. Then the Apache web server is downloaded and installed in the new instance.
The Metapod console is left in the background and you see the Openstack objects pop up as they are created.
Finally the home page of the new web server is tested.


Conclusion

It is very easy to get rid of the delays, the misunderstandings and the inefficiency of many current IT organizations.
If you standardize the process that developers follow to obtain the environment for a new project - in all the phases of the life cycle - you can enable a faster go to market for new business initiatives making your customers happy.
It would be a first step towards DevOps (more is required, mostly in changing the culture of both developers and people in operations).

Infrastructure as code is a brilliant way to create the needed infrastructure on demand (and release it when no longer needed), to maintain it based on blueprints and manage the definition of the infrastructure with the same tools you use for the application source code: a text editor (or your preferred IDE), a version control system, an automation tool.

If you have a IaaS platform like Openstack, provisioning of both virtual and physical resources is made easy.
If you do a further step forward with a managed service, someone will grant that your Openstack is correctly configured for production, up to date and in perfect health. You enjoy all the benefits, without the hassle of setting it up and operating it daily.


References:
Configuration to run acceptance tests for Terraform/OpenStack - https://github.com/berendt/terraform-configurations
Why don't you try Openstack (without getting your hands dirty)? - http://lucarelandini.blogspot.it/2016/06/why-dont-you-try-openstack.html