Showing posts with label Cisco. Show all posts

June 9, 2023

Infrastructure as Code: making it easy with Nexus as Code

In previous posts I've described the advantage provided by managing the infrastructure the same way developers manage the application code.

Infrastructure as Code means using the same toolset (version control systems, pipeline orchestrators, automated provisioning) and same processes for building, integrating, testing and releasing the system that are used in the release cycle of a software application. This approach has a positive impact on speed, reliability and security end to end.


Together with Ansible, Terraform is one of the most used tools in the automated provisioning space, and many organizations use it when they adopt Infrastructure as Code. The availability of plugins (Terraform Providers) for almost every possible target (physical and virtual servers, network and storage, cloud services, etc.) makes it a common platform for automation: a "de facto" standard.

As many other technology vendors, Cisco offers Terraform Providers wrapping the API of their products, especially for Data Center and Cloud technologies. The Nexus family of switches, that includes the ACI fabric architecture, makes no exception. You can provision and manage the ACI fabric easily with Terraform (as well as with Ansible), and many examples and reusable assets are available at DevNet.

Generally, Terraform Providers surface the object model of the target system so that resources and the their relationships can be managed easily in a configuration plan, representing the desired state of the system. You need to understand how that particular system works and, in some cases, to manage the relationships among managed objects identifiers explicitly.

This is an example of creating a tenant in ACI, and a VRF contained in it:


Some engineers find this object model, and the use of the HCL (Hashicorp Configuration Language), easy and comfortable. Others, maybe due to a limited experience, would prefer an easier syntax and simpler object model.

For this reason Cisco has created a module called Nexus as Code, that sits on top of the standard ACI provider for Terraform, hiding the perceived complexity and offering a simplified object model. The objects that are contained in each other are simply nested and represented in a way that's very close to the conceptual representation of the logical architecture (represented by the following picture)


Nexus as Code can be seen as a (optional) component in the Terraform solution to automate ACI and other network controllers from Cisco.


Using a configuration language as simple as YAML, nesting is represented with indentation in Nexus as Code. This example corresponds to the HCL snippet above:


This format is particularly suitable for copy/paste operations, that make it easy to clone and modify a template so it is ready for a new project.

If you start from the example above, simply copying one line you can have one more VRF created and contained in the same tenant. Definitely simpler that doing the same in a HCL file, and encouraging for a network engineer the first time he/she uses Terraform. 

Everything you need is a folder to store one or more YAML file defining the desired state of the ACI fabric, and the installation of the Terraform binary file (free download from here). After that, you will just use the following two commands:

terraform init (that makes sure that the needed providers are installed, and eventually downloads them automatically)


terraform apply (that reads the input, evaluates changes required to align the state of the target fabric to the desired state, then call the API of the ACI controller)


when you confirm the apply, you will see the log of the execution and finally the message will tell that the job is done.


I believe that Nexus as Code is a powerful tool that may help engineers to approach the IaC (Infrastructure as Code) methodology easier, with no stress due to learning new complex technologies and tools.

Being based on standard, open-source tools, it does not introduce any lock in with Cisco technologies. 
It simply translates easy-to-manipulate YAML files, that describe your desired state, into plain Terraform plans that are executed automatically.

So you can start adopting the same tools and same processes that developers use in building, integrating, testing and releasing the system, obtaining the same benefit in terms of speed, consistency, security and self-documentation.

Don't be shy, start today to experiment and see how easy it is 😜


May 25, 2020

Cost control in a multicloud world - part 2


This post is the second part of a discussion about optimization of the cloud budget and cost control in your IT organization. The first part is here.

The CloudCenter Suite


The CloudCenter Suite is a key component in this framework: it is made of three modules that offer provisioning, lifecycle automation and – what we are discussing here – cost control.

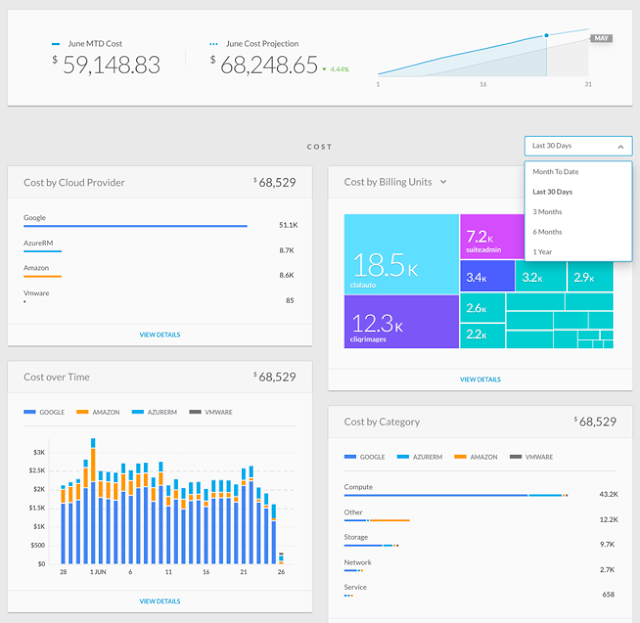
The Cost Optimizer module collects data from the API of all the cloud providers to create a series of detailed reports, that you can use to understand where and why you spend your money. You can slice and dice the information across different dimensions, and you can schedule reports or download them to feed a billing system.

complete and granular reporting of cloud spend


You can create any custom organizational hierarchy to map your business (departments, customers, projects, etc.) and give them visibility and responsibility of the budget consumption.


custom hierarchy of cost groups


budget management with Cisco CloudCenter Suite
budget management


The Cost Optimizer gives you recommendations for rightsizing, wherever your assets are deployed, analysing their behavior. You can evaluate the suggestion and then act manually, or you can enable the tool to do it for you automatically.

recommendations for rightsizing and other optimizations


It will also tell you when it makes sense to adopt reserved instances to get a discount, showing you how much you’re going to save.


Act now to reduce your spending… across all clouds


The best practices and the tools are there. You can choose among tools that are specific to a cloud provider (they all offer good solutions) or a cloud agnostic solution that works with all clouds.

With the Cisco CloudCenter Suite you get a fully detailed report of your inventory, all the services you are consuming everywhere, and the efficiency from a budget standpoint.

You also get actionable suggestions to save money that can be, if you configure the tool to do so, executed automatically. If you prefer, you can just get the list of suggested actions and implement them manually.

Thanks to the Cisco CloudCenter Suite you can setup a common governance model and a set of policies in one place, instead of replicating the build of reports and automation in every single cloud, based on full visibility that goes beyond the suggestions given by your service providers.

All you have to do now is to download and test the CloudCenter Suite (30 days trial), or contact us for a live demo or a discussion of your use cases.

Cost control in a multicloud world

Using public cloud is not as cheap as you expected?

Is allocating budget and verifying spending a little more difficult than they had told you?

You’ll probably find some best practices and tools for cost control in public cloud services, described in this series of two posts, useful to improve the efficiency of your consumption. They apply to every IaaS and PaaS service in a multicloud context.

What CxO expect from IT


Surveys show that the enterprise IT is getting a predominant role in front of the lines of business when they need cloud services. Not just to select the best solution for them, but to help keeping the financial aspects in control (source: RightScale State of the Cloud Report).


role of enterprise IT in cloud decisions


Looking at the initiatives, that is where budget is allocated, cost control and cost saving is on top:


Allocation of budget for cloud initiatives


Like drug dealers


Cloud providers are making a lot of money. And, of course, they want more customers and they want to retain the existing ones. Competitors steal some, and others just fly away when they realize that operating applications in production is more expensive than they had thought.

So, they offer you some candies, just to taste what a beautiful trip they can offer you. Even with a free account, you get amazing services that work very well. See also Azure and Google. They all make building business applications quick and easy.


appealing services offered by AWS


Developers are attracted by that, and they love creating cloud native applications using PaaS services. But they do not realize, or they just don’t care of, how expensive it will be to run applications in production.

In addition, they generate a lock-in because PaaS services are not portable across clouds.


Is public cloud easier or is it cheaper?


Now ask yourself this question: do you use the public cloud because it’s easier or because it’s cheaper? Or maybe you’re just lazy and you want to delegate the SLA responsibility to the service provider?

I will not discuss if it’s easier in this post. But, for sure, it’s not cheaper. Budgets go out of control very often.

Those are some tips from Amazon (source: AWS re:Invent2019)

tips for saving from AWS


Of course, cloud providers want to help you to be efficient but… not too much! The two green actions look like the most effective, now let’s see if we can do anything better.


Cost control framework


We could create a cost control framework, as the large company I took this information from.


cost saving framework


We focus mostly on two aspects: avoidance of unnecessary costs and iteration of the improvement actions.

In the avoidance best practice, we concentrate on the efficiency of VM snapshots retention: how many and how long. Storage volumes and public ip addresses should be monitored, because they generate a cost. When you use a S3 storage you can optimize the cost based on frequency of access, speed and size. And VM should not be larger than need, because you pay also the capacity in excess.  Suspending VM at night, in the weekend or whenever the business application is not used, also saves money. And so does scaling capacity dynamically

You should monitor the situation carefully, and automation helps here. You can setup alerts and governance policies, having reports sent to the stakeholders. Automation in provisioning, but mostly in reporting and resource adjustment is key.


You can obtain important savings


This is what cost optimization saved in the context of a large SaaS service operations. Most of the saving comes from adoption of reserved instances where appropriate and from cleaning environments used for proof of concepts. The total saving is $7M per year.


savings from cloud optimization


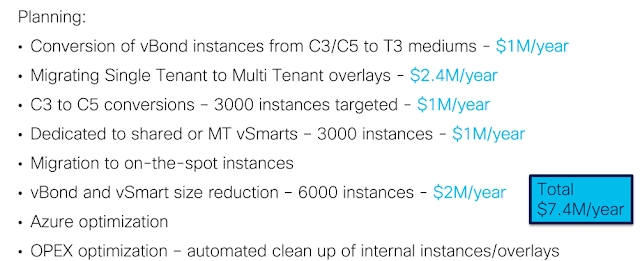
And this is what they are planning: choosing the right instance types, rightsizing, cleaning up will save $7M more per year.


expected savings from recurring optimization


Cost control: a solution


We will examine a simple 3 steps process to save your budget.


  1. Understand your assets and ecosystem
  2. Optimize based on best practices, on investigation through your assets or... recommendations from a tool
  3. Avoid unnecessary costs and iterate of the improvement actions

Easy principles to set a governance model are:

  • Define (and enforce) budgets for your customers, projects and departments.
  • Monitor and report about that.
  • Set policies to automate suspension, autoscaling and cleanup.

Cisco offers a solution that helps you to achieve all that, quick and easy.

We have built a framework that is based on the feedback loop suggested by best practices (e.g. the second principle of DevOps recommends looking at the entire system as a whole and iterating the optimization).


the optimization loop

In next post you will find a solution for implementing your cost control quickly and consistently across all the clouds you use: any combination of private cloud technologies and public clouds, with no need to adopt specific solutions for each individual target.

Keep reading, it will prove useful for your strategy.


January 22, 2020

Teaching Alexa to deploy applications in any cloud

Alexa, deploy a webserver in AWS and a database in Azure!


Recently I presented a session at Codemotion Milan, with my colleague Stefano Gioia.
We demonstrated how the API exposed by the Cisco CloudCenter Suite can be easily integrated from within an Alexa skill.


Of course, this is not something you would do in the real life in a production environment 🙂
But it’s an easy and funny way to show how easy the integration is, and we found it attractive for our customers and partners.
Instead of Alexa you could use any client, like a custom script from the command line, a workflow engine, a web portal or a ITSM system like ServiceNow to achieve the same result.
Any program that can do a REST call can drive CCS (CloudCenter Suite) externally to orchestrate the lifecycle of a software deployment.
In case you use Alexa, you will code the REST client logic in the serverless implementation of the “skill” that is executed as a Lambda function. You can use different languages to create the skills: we chose node.js for the demo.

We decided to show some basic CCS features like deploying any kind of software in any cloud, or measuring the cost of all the services we are consuming in all our clouds (for running VM and containers, for consuming cloud services like load balancers or network bandwidth, for running serverless functions. etc.). Of course there is much more in the product, but we wanted to keep the demo light and funny.


The 3 modules of the Cisco CloudCenter Suite


Everything you can do in the CloudCenter web portal can also be done through its REST API, and the CCS documentation shows examples you can easily reuse and adapt.

These are the API targets, for the different modules, that we used in the implementation of the skill:

Suite Admin API
/suite-idm/
E.g.: https://na.cloudcenter.cisco.com/suite-idm/api/v1/tenants

Workload Manager API
/cloudcenter-ccm-backend/api/v2/apps
E.g.: https://na.cloudcenter.cisco.com/cloudcenter-ccm-backend/api/v2/apps

Action Orchestrator API
/be-console/
E.g.: https://na.cloudcenter.cisco.com/be-console/api/v1/workflow

Cost Optimizer API
cloudcenter-shared-api
E.g.: https://na.cloudcenter.cisco.com/cloudcenter-shared-api/api/v1/costByProvider?cloudGroupId’


Next picture shows the high level process that allows a user to get something done by Alexa, just by speaking to a Echo device or to the Alexa mobile application.
The speech recognition system translates the user’s voice to text, then the “intent” of the user is matched to one of the functions available in the skill. Skills and their intent are executed based on patterns and keywords that the system is able to recognize in the natural language, thanks to machine learning algorithms.


Recognizing an intent triggers your custom code, that is generally a Lambda function (the Amazon developer console makes it easy to write the code and to host it in the Lambda service, providing also reusable examples). The outcome is rendered as audio or, depending on the device, also as a video.
In our specific demo, we put the client code for the Cisco CloudCenter API in the serverless implementation of the intent.
These are the commands that we can give Alexa:

  • give me the list of existing tenants
  • list all configured target clouds
  • deploy a database or a web server in a cloud
  • show current cost of all cloud services

Here you can see a sample of the capabilities of Alexa when it calls the Cisco CCS API:


Building a new Alexa custom Skill: as the skill developer, you have to:

  1. Define the requests the skill can handle
  2. Define the name Alexa uses to identify your skill, called the invocation name
  3. Define the utterances and input variables, called slots
  4. Write the code to fulfill the request
  5. Test it from the developer console or from your Alexa device


The documentation at the Amazon Developer console contains excellent tutorials to build Alexa skills.
You can learn easily to create a Hello World skill, then you are ready to incorporate the client code to call the CloudCenter Suite API.
Stefano has published his examples in github here, feel free to test it yourself.

This demo demonstrates that it's easy to build a client to drive the API exposed by CCS.
And it helps positioning the CloudCenter Suite as a mediation layer in your architecture, to orchestrate the lifecycle management and to define a governance model including cloud cost control.


July 19, 2019

Just one button to provision a production-grade Kubernetes cluster

(this is a guest post, authored by my esteemed colleague Fabio Di Niro)

Do you remember?


I bet all of you who are working or playing with Kubernetes remember perfectly the first time you tried to install it.
And the second.
And the third.
...
And the one that finally worked out.

And if you’re a professional you remember also the long path that brought you to own the expertise on Kubernetes that you need to install and fine-tune production grade clusters.
Or, if you’re not a Kubernetes professional, you probably remember how much time it took for you to find someone able to perform a valid Kubernetes install...and how much it costed.

To save all this time and effort to our customers Cisco released the Cisco Container Platform (CCP), a turnkey solution to easily provision production-grade Kubernetes clusters on-prem or in the cloud in minutes, with few mouse clicks and requiring little to no knowledge of K8s.
All the needed integrations with network, storage, computing and security are done automatically by CCP so that the provisioned K8s clusters are ready to run in production.
Clusters provisioned by CCP are already equipped with finely configured monitoring and logging tools like FluentD, Grafana, ElasticSearch, Kibana.
Through the Container Network Interface (CNI) you can choose whether to leverage Cisco ACI as network infrastructure or Calico (no dependence on the underlying infrastructure).

This is already great, but I thought to create a demo that may push the simplicity of those “few mouse clicks” to its limit, making possible to create a production grade cluster in just one click.


Introducing the Kubernetes dash button.

The concept is fairly simple: build a dash button that, once pressed, creates a production grade Kubernetes cluster ready to use.

Leveraging the rich set of the Cisco Container Platform (CCP) APIs this is even too easy, so I thought to add some more feature on top:

- I wanted to provision the cluster and access it just through the dash button. So, I want CCP to display on the dash button itself the IP address of the master node of the cluster created
- The start and finish of the cluster provisioning process had to be confirmed, so the communications had to be bi-directional with the dash button
- I wanted a fair battery life that would avoid me to recharge the button every day, so I needed to have electronics able to sleep or hibernate
- My lab, where I have the infrastructure and the CCP, is behind a proxy, so I can’t listen for calls inside the lab, I can just initiate communications from the lab. So, I needed a way to change the “push” of the button in a “pull” of the button press information
- I wanted to use the button everywhere I go without worrying about the local Wi-Fi settings


How it works

To satisfy all the above requirements I added a couple of elements in the picture, ending up with the following architecture:


The button is based on an Arduino ESP 32 board, it connects via Wi-Fi to my smartphone and uses its internet connection, this way I can use the button everywhere my phone has data signal. The button leverages a publish-subscribe message service (MQTT) in the cloud to bypass the limitation of the proxy I have behind my lab and reach a couple of scripts that calls the right API in the Cisco Container Platform to trigger the provisioning of a shiny new Kubernetes cluster.
Once the cluster is provisioned the IP address of the master node is returned to the dash button that shows it on its display, at this point it is ready to accept connection and be used.

A 3D printed enclosure completed my project, I took an existing model but then I decided to  leverage the capabilities of CCP to deploy K8s clusters on-prem or in the cloud so I designed the two different enclosures you can see in the picture to have two different dash buttons for the two different deployment target.
All the code and 3D designs have been released and are publicly available at: https://github.com/fdiniro/CCPDashButton


Now, before doing my demo, I can ask to my customers: “How much time and effort takes you to install a production-grade, fully operationalized and secured kubernetes cluster?” and whatever answer I get I know I can answer “I can do it in 2 minutes blindfolded and cuffed”.

You can see the recorded demo here: https://youtu.be/-F-xR0XNPBs


June 20, 2019

A new community for Cisco Multicloud software users

Today we are launching a new project, that is a local community of people interested in the Cisco software solution for multicloud.

Before you go on reading, this is our next meeting:
Rome and Vimercate, October 23, 2019 - Cisco offices (details below)

Like many open source communities (e.g. meetups on various technologies) our goal is to spread information, share experience and offer access to experts to discuss your own use cases. In our opinion, this could be beneficial for customers, partners and people that are just curious about multicloud and the open source technologies. Of course, the expected result is also to facilitate sales of Cisco technology, products and projects.


That is the value for Cisco, but what's in it for you? 

We think that joining this community (meetings will be in Italian) you could learn the solutions offered by Cisco for multicloud in an informal context (and for free), understand what use cases you can implement and how, how Cisco technologies integrates with the open source technologies like Kubernetes, Docker and others, how to adopt DevOps and, why not, learn the open source stuff regardless the integration with Cisco products. We will also offer hands on labs and activities that matches learning and fun (e.g. teaching Alexa to deploy a database, or create a Kubernetes cluster).
In addition, you get some pizza and beer for free :-)
At the end of the day, it's an easy learning opportunity, a (bidirectional) share of experience, a stage where you can show - if you like - your knowledge and share the experience you've done in your project. Offering help to others or receiving support from peers and from the Cisco experts.


We are starting an experiment

We are starting with a few meetings planned, see the agenda below.
We thought that scheduling outside the office hours will make it easier for you to join, avoiding conflicts and positioning this community as a place where you go for fun. Or, at least, with no relation with your role in your company. As an individual you learn subjects that make your work easier and your resume more interesting, so maybe this is worth dedicating 2-3 hours in your spare time (e.g. every second Thursday of each month, from 5 to 8 pm, pizza included).
We will ask your feedback about the schedule, so that we move to a different time of the day or cadence according to your preference.
And, of course, about the subjects we're going to address in next meetings so that we stay relevant for you.
An additional value is introducing you with the official Cisco DevNet community, that is our developers community.
We are going to leverage a lot of amazing material from DevNet, including documentation, tutorials and sandboxes where you can experiment with no need to install the products and no fear of destroying the environment: it's there for your enjoyment and will be reset after you use it.
Every event will be split in 2-3 sessions:
  • one based on presentation/demo of a Cisco product, 
  • one based on a subject from the open source world that is not necessarily related to Cisco. Sometimes the integration of open source and Cisco API will be demonstrated.

We will keep each session short and crispy and every event will have a hands-on activity to keep you awake.
When possible we'll add a lab activity that participants can do directly from their laptop.


Next topics

This is a temporary, draft list of the subjects we could offer in the first series of meetings: we can prioritize them based on internal feedback or through a survey with the attendees of first meetings (or sent remotely to the community).
  • Amazon Alexa integration
  • Devops - CI/CD with CloudCenter - (VM)
  • Devops - CI/CD with CloudCenter - (containers)
  • The ACI CNI (ltechnical intro)
  • The ACI CNI (use cases, operational model)
  • Multcloud cost control
  • Serverless lab
  • Devnet sandboxes
  • Devnet Express - programmability
  • Meet The Engineer or design clinic - bring your on use cases
  • ACI and Terraform
  • Managing k8s clusters in cloud and on prem
  • Automating the Software-Defined WAN

The next event we have planned is at the Cisco offices in Rome and Vimercate, on October 23, 2019.

Address: 

Time: 

  • from 5 pm to 8 pm (pizza and beer included)


This is the proposed
agenda (no technical requirements to attend):

- Why this meetup (10')
Container track: container 101 (theory, use cases, application architectures)
- Cost control with CloudCenter (30')
- Pizza & beer
- DevOps: Testing methodology (30')

Registration required


To register for the event, please click here.
See you soon!


References

Cisco DevNet - https://developer.cisco.com 


July 31, 2018

Creating a complete CI/CD environment in few minutes


In a previous post we introduced CI/CD as a Service (CD/CDaaS) and talked about how it can transform and increase the efficiency of your DevOps practice, to serve development teams and Line Of Business (LoB) better.

In this post we will show how to effectively create a CI/CDaaS with Cisco CloudCenter, either for an organization’s internal use or to offer it to your customers, in case you’re an IT service provider.

With our CI/CDaaS we are able to:

1 - Automate the creation of a complete environment for a development project, including:
  • a source code repository (we chose SVN, but it could be GitLab or any other), 
  • an integration server / orchestrator (Jenkins),
  • an artifact repository for the builds (e.g. JFrog Artifactory or Nexus, but it could be any solution including a simple web server or an FTP server)
  • a number of workstations (one per developer) ready to be used with all the needed tools: Eclipse, database tools, etc.
  • a remote desktop access to the workstations, even if the developers don't have access to the network where the project environment is created
2 - Integrate all the above tools end-to-end, creating a complete chain for CI/CD with no human intervention required.
3 - Get every build - generated automatically after any commit in the source code repository - deployed automatically in one of your targets, selected according to the project phase, e.g. development in an on-premises VMware environment, integration test in on-premises OpenStack, and production in AWS public cloud.
4 - Get acceptance tests - required to promote a deployment to the next phase/environment - executed automatically after each deployment in one of the environments.

Everything we describe is implemented using Cisco CloudCenter as the main orchestration engine, in a multicloud context, meaning you can select any private or public cloud as a target for the deployment).

The next picture represents a project leader ordering the deployment of the CI/CD toolset for two distinct projects, possibly in different clouds. 

Creating a complete chain for CI/CD with no human intervention, for two different tenants, with CloudCenter


Step 1: Self-service in the CloudCenter catalog


Accessing the self-service catalog in CloudCenter, the user can order the deployment of a single application or a complex set of components, like our CI/CDaaS service (we call these Application Profiles):


Application Profiles in the self-service catalog


As you can see from the image above, we have created 2 Application Profiles for this demo. The use case is having a development team that releases daily builds of a web application (PetClinic), so we have built:

  1. A cloud-agnostic Application Profile to deploy PetClinic, that takes the binary files required for the deployment from a common repository (that will be the Artifactory server created by our CI/CD service described below). The name of this Application Profile (that is a service in the CloudCenter catalog) is “Clinic”. You can select one specific version of the application binaries that you want to deploy from the Artifactory repository (by default you use the last build available).

    Please note that we will not focus on the way a generic Application Profile is built and deployed, because it’s covered in the CloudCenter documentation, but PetClinic is functional in our example as developers will generate new builds that need to be deployed.

  1. A cloud-agnostic Application Profile to deploy the CI/CD toolset including SVN, Jenkins and Artifactory, installed in their own VM. The name of this service in the CloudCenter catalog is “AdvancedDevOpsEnv”; it creates an operating project environment where the “Clinic” application can be deployed automatically at every new commit made by a developer.

    This is the implementation of our CI/CDaaS concept.


Step 2: Deploying the CI/CD toolset


When you “order” the AdvancedDevOpsEnv service you have to set the name of the new project and some options for the deployment (which cloud target, the amount of resources to be allocated when VM or containers are created, etc.); the next picture shows the order wizard in CloudCenter, where you make these selections.


CloudCenter order wizard: you can choose where to deploy the CI/CD toolset and the size of each VM


You can monitor the progress of the deployment while the job runs (it takes approximately 15 minutes to complete) as you can see in the image below:


Watching the progress in CloudCenter: last deployment state is "Deployed"


Once the deployment is complete, you can see the details of the new VM that has been created by clicking on the server representation on the left (e.g. Jenkins – see next picture) and expanding the list of running nodes on the right.

Please Note:
  • The IP address of the VM is exposed by CloudCenter.
  • You can access the VM via SSH or RDP directly from the browser (that is very important because connectivity and security are proxied by CloudCenter, so you don't really need any access to the actual network where the VM is deployed).


Accessing the details of the VM and the log of actions executed by the agent


Step 3: verifying the configuration made by CloudCenter

The Jenkins orchestrator is automatically setup with a connection to the SVN source code repository (see the Jenkins job “repo1”, that is the name provided by the user for the repository when he ordered the deployment) and with Cloud Center (see the Jenkins job “deploy”).


The Jenkins orchestrator and the 2 tasks created by CloudCenter


The only manual configuration we need is to set the login and password used by CloudCenter to access the SVN repository (we were not able to automate this configuration): you just need to click on the Jenkins task repo1 (next picture), then click Configure and enter your credentials (in our example, user001/C1sco123). At this point, Jenkins is fully configured and ready to go.


Jenkins: setting credentials to access the SVN repository


The jFrog Artifactory is also ready to receive binaries from Jenkins, at each new build of the application, because CloudCenter sets the required information when configuring Jenkins and Artifactory. Note that the Artifactory repository name (repo1) is the name used for the SVN repository, provided by the user when he ordered the deployment.


The Artifactory repository for binaries (it will host all the builds generated by Jenkins)


Finally, we configure a new Repository in CloudCenter (there might be many), that needs to point at our new Artifactory repository to deploy new builds of your application automatically as they are released.


Cloud Center: setting up a repository for the artifacts that will be deployed


Here we set the IP address of the Artifactory server:


Setting up the repository on Cloud Center


We have now completed the setup of a CI/CD environment for a new project, just consuming a reusable service that creates it in 15 minutes (CI/CDaaS).

In the next post will show how to use it, following the lifecycle of the PetClinic application from editing the source code to automated deployment.

Credits 


This post is co-authored with a colleague of mine, Stefano Gioia.